Google Forms have become an invaluable tool for collecting data, conducting surveys, and gathering feedback.
Whether running a personal blog or managing a business website, embedding a Google Form in WordPress can streamline your data collection process and enhance user engagement.
In this step-by-step guide, we’ll walk you through embedding a Google Form into your WordPress website, along with tips for customization and troubleshooting.
How to Create Your Google Form?
Before embedding a Google Form in WordPress, you must create your form on the Google Forms platform.

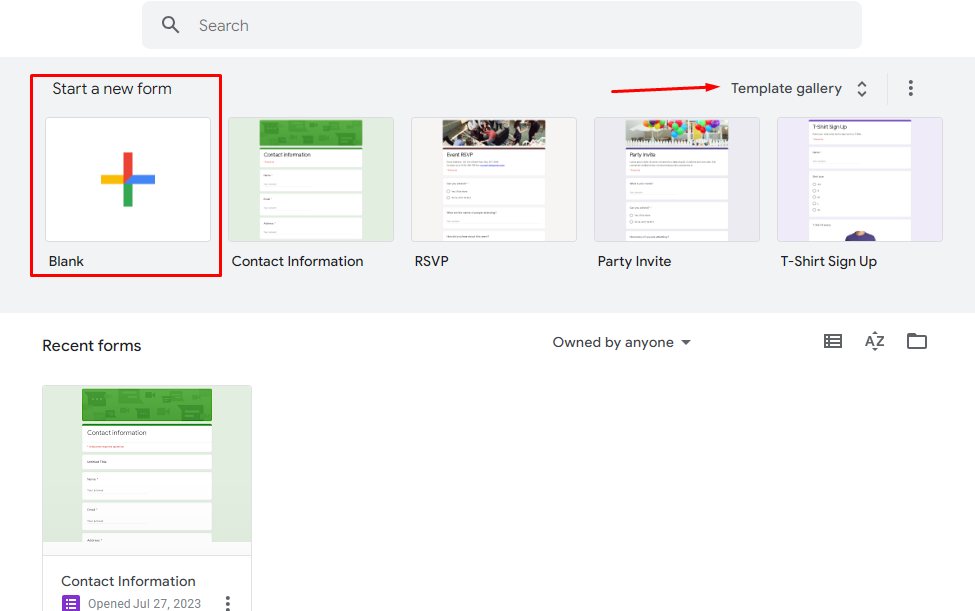
Log in to your Google account and access Google Forms. Once there, click the “+” button to create a new form or select an existing template to customize.
Google Forms offers a range of question types, including multiple-choice, text entry, and more.
Tailor your form to suit your needs, and don’t forget to enable additional settings, such as limiting responses or requiring sign-ins for respondents.
How to Obtain the Google Form Embed Code?

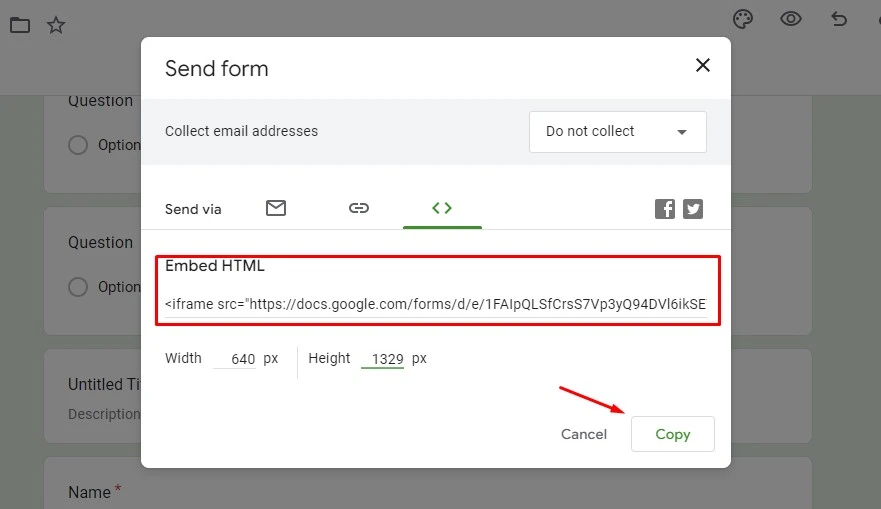
Once you’ve created your Google Form, click on the “Send” button (paper airplane icon) located in the top-right corner of the form builder. A popup window will appear with different sharing options.

Look for the “< >” icon to access the embed code. Click on it, and the embed code will be displayed. Copy the complete embed code, as it contains an iframe element that allows you to embed the Google Form on your WordPress website.

How to Embed Google Form in WordPress?
With the embed code in hand, it’s time to add the Google Form to your WordPress website.
Log in to your WordPress dashboard and navigate to the page or post where you want to embed the form.
1. Embed Google Forms in WordPress Classic Editor
If you’re using the classic editor, make sure you’re in the “Text” or “HTML” view rather than the “Visual” view.
Then, paste the embed code directly into the editor where you want the form to appear. Save your changes, and the Google Form will be embedded in your content.
2. Embed Google Form in WordPress Block Editor
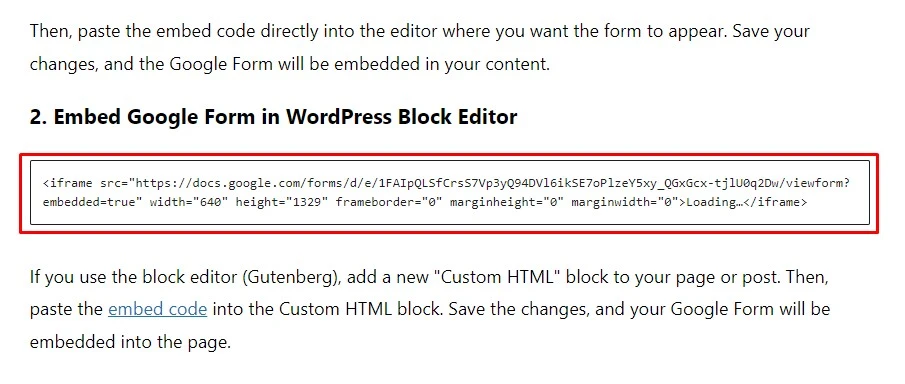
If you use the block editor (Gutenberg), add a new “Custom HTML” block to your page or post. Then, paste the embed code into the Custom HTML block.


Save the changes, and your Google Form will be embedded into the page.
How to Style and Customize Your Google Form?
By default, the Google Form will inherit its appearance from Google Forms. However, you may want to customize the form to match your website’s design.
There are several ways to achieve this:
1. Use Plugins to Customize Google Forms
WordPress offers various plugins that allow you to style and customize the appearance of embedded forms. Look for plugins that support Google Form integration and provide customization options.
2. Use Custom CSS to Style Google Forms
For advanced users, custom CSS can modify the form’s appearance. You can adjust colors, fonts, and layouts to align with your website’s branding.
How to Test Embedded Google Form?
Before publishing the page or post, preview the content to ensure the Google Form displays correctly. Test the form’s functionality, including submitting test responses, to verify that it’s working as expected.
Check the form’s responsiveness on different devices to ensure a smooth user experience across various screen sizes.
Troubleshooting Common Issues with Google Forms in WordPress
Despite a straightforward process, you might encounter common issues when embedding Google Forms in WordPress.
Here are a few troubleshooting tips:
iframe and Security Settings
Sometimes, WordPress security settings can prevent iframes from displaying. Ensure your website allows iframes, or consult your hosting provider for assistance.
Form Responsiveness Issues
If your form appears distorted on specific devices, review your website’s CSS and make necessary adjustments.
Classic vs. Block Editor Compatibility
Ensure the embed code works seamlessly with the classic and block editor to accommodate all users.
Best Practices for Google Form Embedding in WordPress
As you incorporate Google Forms into your WordPress website, follow these best practices:
Keep Forms Updated and Relevant
Regularly update your forms to ensure they remain accurate and relevant to your audience.
Check Functionality
Periodically test your embedded forms to ensure they are functioning correctly and collecting responses.
Seek User Feedback
Encourage users to provide feedback on your forms and use it to make improvements.
Conclusion
Embedding a Google Form in WordPress is a powerful way to engage your audience and collect valuable data.
By following this step-by-step guide and exploring customization options, you can seamlessly integrate Google Forms into your WordPress website, providing your users with a seamless and interactive experience.
Make the most of Google Forms and WordPress to streamline your data collection efforts and drive user engagement on your website.


