When running an online store with WooCommerce, keeping your plugins up-to-date is vital for security, performance, and new features.
However, there might be instances where you need to downgrade a WooCommerce plugin. This could be due to compatibility issues with other plugins or themes, or bugs in the latest version.
In this blog, we will provide you with a comprehensive step-by-step guide on how to downgrade WooCommerce plugin while minimizing potential risks safely.
Let’s start!
Backup Your Website
Before proceeding with any plugin modifications, take the time to create a complete backup of your website.
This includes both the website files and the database. If anything goes wrong during the downgrade process, having a recent backup will allow you to restore your site to its previous state effortlessly.
You can take the backup from your hosting panel or your WordPress website dashboard using a plugin like Updraft or WPvivid.
2 Methods: How to Downgrade Woocommerce Plugin
There are 2 easy and straightforward methods to rollback the Woocommerce version: Manual Downgrade and Rollback using a Plugin.
Let’s discuss them one by one.
Method 1. Downgrade Woocommerce Manually
Follow the below steps to downgrade Woocommerce plugin manually by uploading a Zip file of an older version.
1. Download the Older Woocommerce Version
Determine the specific version of the WooCommerce plugin you want to downgrade to. If you already have the ZIP file for the older version, you can proceed to the next steps.
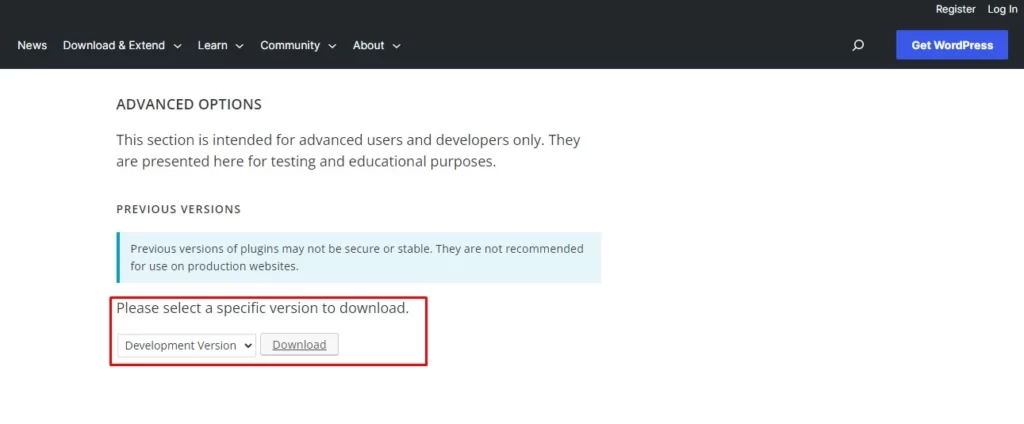
Otherwise, follow the below steps to download an older version of the Woocommerce plugin:
1. Open the wordpress.org website and from the menu, click on “Plugins.”
2. Now search for Woocommerce.

3. Now click on Woocommerce and go to the Woocommerce plugin page.

3. Scroll down and above the plugin rating from the right sidebar, find the “Advanced View” and click on it.

4. Now scroll down and you will find “Previous Versions.”

5. Select your desired plugin version and click download.
6. The plugin zip file will be downloaded to your Pc.
2. Install the Older Plugin Version
1. Login to your WordPress admin dashboard.
2. Navigate to “Plugins” > “Add New” in your WordPress dashboard.
3. Click the “Upload Plugin” button at the top, and select the ZIP file of the older WooCommerce plugin you downloaded.
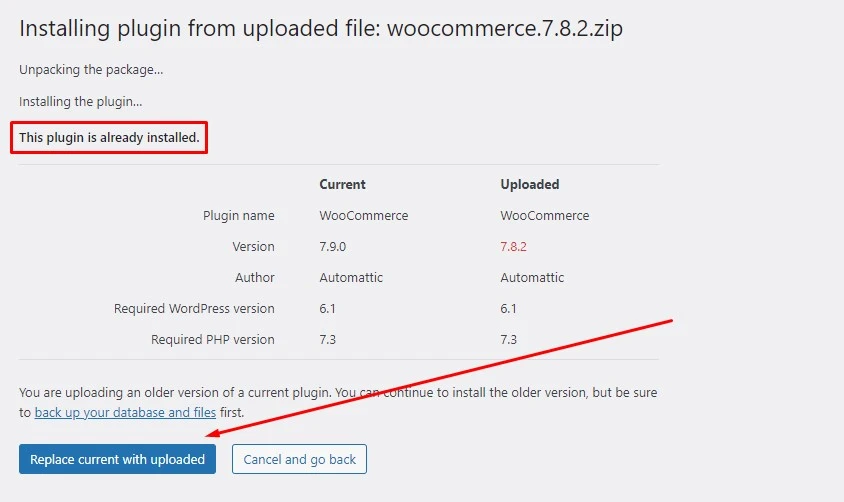
4. Now a screen will appear showing that “This plugin is already installed.”

5. Just click on the “Replace current with uploaded” button. It will override the existing plugin file and replace it with your uploaded files.
6. It will install the older WordPress Woocommerce plugin version.
3. Activate the Older Plugin Version
After the installation is complete, you should see an “Activate” button. Click on it to activate the downgraded version of the WooCommerce plugin on your website.
Method 2: Using a Rollback Plugin
In this method, we will use a rollback plugin to downgrade Woocommerce to a previous version.

1. Install the Rollback Plugin
- Open the WordPress dashboard.
- Go to Plugins and click on “Add New.”
- Now search for rollback and install the “WP Rollback” Plugin.
- Download it and activate it.
2. Downgrade to Older Woocommerce Version using “WP Rollback”
1. Now go to the plugins page and find Woocomerce.
2. You will find the “Rollback” option below the plugin name.

3. Click on and it will take you to Woocommerce older versions page.
4. Select an older version you want to download.

5. Then click on the “Rollback” button.
6. Wait a while and your Woocommerce plugin will be downgraded to your selected version.
Check the Compatibility and Functionality of Your Website
With the older plugin version now active, it’s crucial to test your website’s functionality thoroughly. Verify that the plugin works as expected and doesn’t conflict with other plugins or themes.
Check if the downgraded plugin is compatible with your current WordPress and WooCommerce versions.
How to Prevent Auto-Updates for Downgraded Plugin
To prevent the downgraded plugin from automatically updating to the latest version, you can use various methods.
One common approach is adding a code snippet to your website’s functions.php file. Alternatively, you can use a dedicated plugin to control updates for specific plugins.
You can also turn off automatic updates on your WordPress website.
Conclusion
Downgrading WooCommerce plugins can be a helpful solution when facing compatibility issues or other challenges with the latest releases. However, it’s essential to approach this process cautiously.
Always create a website backup before making any changes, and ensure you are using a trusted source for downloading the older plugin version.
Regularly update your plugins whenever possible, as newer versions often include critical security patches and improvements.
