While WordPress offers a range of features to customize your content, sometimes you may need to embed specific HTML elements to achieve the desired look and functionality.
In this blog, we will explore two simple methods to embed HTML in your WordPress website, giving you the power to take your site to the next level.
What is an HTML File?
An HTML file is a text file that contains the code and structure of a webpage. HTML stands for “HyperText Markup Language,” and it is the standard language used to create and design websites and web pages. HTML files are the building blocks of web content and are responsible for defining the structure and layout of a webpage, as well as the content that appears on it.
HTML files use a markup language consisting of various tags, which are enclosed in angle brackets (“<” and “>”). These tags provide instructions to web browsers on how to display the content on the page. Each tag serves a specific purpose, such as defining headings, paragraphs, images, links, tables, and more.
Example of an HTML File
Here’s a simple example of an HTML file:
<!DOCTYPE html>
<html>
<head>
    <title>My First Webpage</title>
</head>
<body>
    <h1>Hello, World!</h1>
    <p>This is my first HTML webpage.</p>
    <img src="example.jpg" alt="Example Image">
    <a href="https://www.example.com">Visit Example Website</a>
</body>
</html>
In this example:
<!DOCTYPE html>declares the document type and version of HTML being used (in this case, HTML5).<html>is the root element and encloses the entire HTML content.- <head> contains meta-information about the webpage, such as the title (shown in the browser tab) and links to external resources.
<title>sets the title of the webpage.<body>contains the visible content of the webpage, such as headings, paragraphs, images, and links.<h1>is a heading tag that defines the main heading of the page.- <p> is a paragraph tag used to create paragraphs of text.
<img>is an image tag that embeds an image on the page.<a>is an anchor tag used to create hyperlinks to other web pages or resources.
When a web browser encounters an HTML file, it reads the code and renders the content according to the instructions provided by the HTML tags. This process results in the visual representation of the webpage that users see and interact with in their browsers.
Why Upload HTML Files to WordPress?
Uploading HTML files to WordPress can be useful for specific scenarios and requirements. However, it’s important to understand the implications and potential limitations before doing so.
Here are some reasons why you might consider uploading HTML files to WordPress:
1. Static Content Hosting
If you have static HTML files that you want to share or display on your WordPress website, you can upload them to your WordPress server.
This allows you to host and serve these files directly from your WordPress site, making it convenient for users to access them.
2. Custom Landing Pages
Some website owners prefer to create custom landing pages using HTML and CSS for specific marketing campaigns or promotions.
By uploading these landing pages to WordPress, you can leverage the platform’s features and integrate them into your site seamlessly.
3. Complex Design and Layouts
In some cases, you may have complex HTML/CSS designs or layouts that are challenging to recreate using WordPress themes or page builders.
Uploading the HTML files allows you to maintain the original design while integrating it into your WordPress site.
4. Custom Forms and Interactivity
If you have HTML files that contain custom forms or interactive elements that require specific scripting or backend processing, you might choose to upload them to WordPress to maintain their functionality.
5. Legacy Content Migration
When migrating from a static website to WordPress, you may have existing HTML files that you want to preserve. Uploading them to WordPress can ensure continuity and avoid broken links.
2 Simple Methods to Embed HTML in WordPress
Method 1: Using the WordPress Editor
In the newer WordPress, Gutenberg is the default editor to edit posts and pages. It is a visual editor to perform your development and designing tasks easily.
To embed HTML using this method, follow these steps:
1. Access the WordPress Dashboard
Log in to your WordPress dashboard using your credentials. Once logged in, you’ll land on the dashboard where you can manage your website’s content and settings.
2. Create or Edit a Post/Page
To begin, create a new post or page, or edit an existing one. The editor will be where you input your content.
3. Add an “HTML” Block
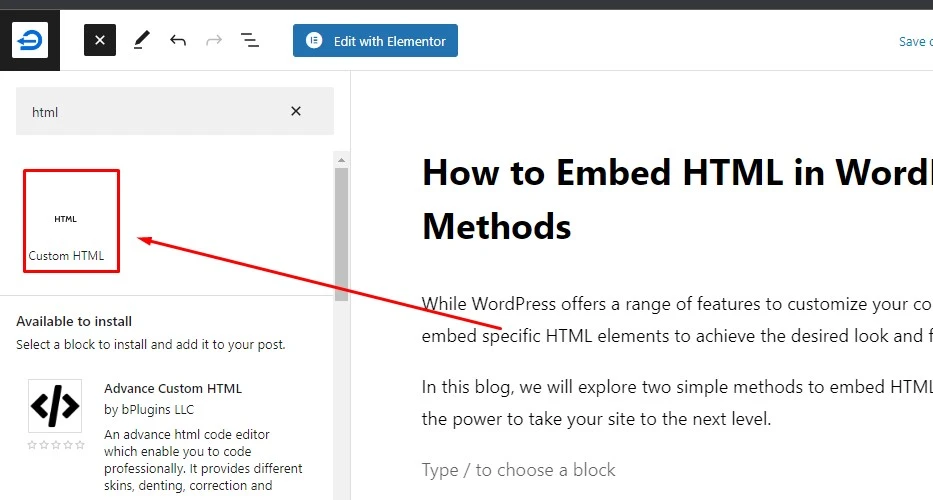
Now from the block editor click on the “Plus” icon and search for “Custom HTML”.


Click on the “Custom HTML” to insert it into your page or post. After adding the “Custom HTML” block you will see a field named “Write HTML…”. It is where your custom HTML code will go.

4. Insert Your HTML Code
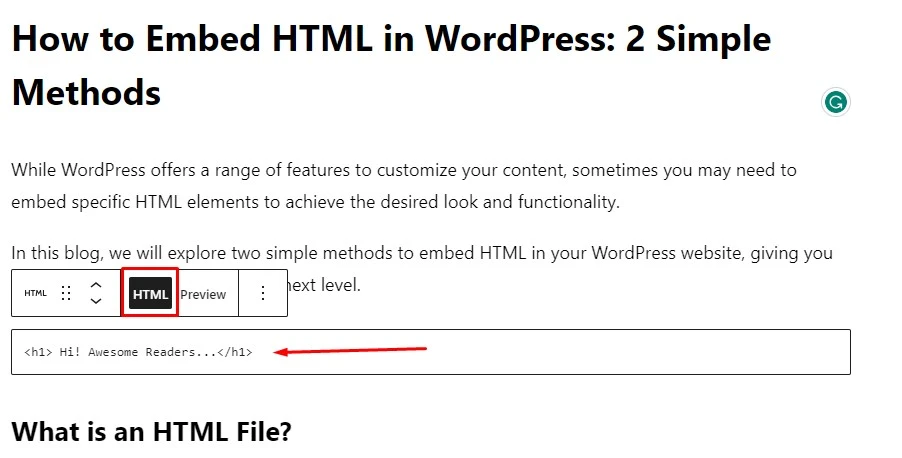
In the HTML editor or block, paste the HTML code you want to embed. This could be anything from custom forms to interactive elements or even embedded videos.

You also have the option to preview your added HTML code in the editor. Just click on “Preview” from the bar above your HTML code field to preview your HTML code.

5. Save or Update
Once you’ve inserted the HTML, save or update the post/page. Now, your HTML code will be embedded in your content, adding the desired functionality.
Method 2: Using the Hosting File Manager
Embedding HTML in WordPress using the hosting file manager involves manually uploading your HTML file to the server and then linking to it from your WordPress pages or posts.
Here’s a step-by-step guide to help you with the process:
1. Prepare the HTML File
Create or edit the HTML file that you want to embed in WordPress. Make sure the HTML file is well-formed and includes all the necessary code and assets (e.g., images, CSS, JavaScript) if required.
2. Access File Manager
- Log in to your web hosting control panel. The exact steps to access the file manager may vary depending on your hosting provider and the control panel they use (e.g., cPanel, Plesk).
- Once logged in, locate and open the “File Manager” or “File Manager/File Explorer” option. This tool allows you to manage your website files directly on the server.
3. Navigate to WordPress Directory
- In the file manager, navigate to the directory where your WordPress website is installed. Typically, WordPress files are located in the “public_html” folder or a subfolder if you installed WordPress in a subdirectory.
- If your WordPress site is installed directly in the root directory (e.g., example.com), you should see the WordPress core files (e.g., wp-config.php, wp-admin, wp-includes) in the main directory.
4. Upload the HTML File
- In the WordPress directory, click the “Upload” or “Upload Files” button in the file manager toolbar.
- Select the HTML file from your local computer and proceed with the upload. The file manager will display a progress bar indicating the upload status.
- Once the HTML file is uploaded successfully, you should see it listed in the file manager.
5. Create a WordPress Page or Post
- Log in to your WordPress dashboard.
- Create a new page or post where you want to embed the HTML content. If you prefer to edit an existing page/post, open it for editing.
6. Insert the HTML Link
If you have uploaded an HTML file as a page and want to show it on your website menu simply copy your file link and insert it into the menu. Your file link will be like https://www.example.com/path-to-your-html-file.html
Here is our complete step-by-step guide on How to Add a Page to Menu in WordPress?
But if you want to add a file link to one of the pages or post, just copy and paste the link as a normal link.
Replace “https://www.example.com/path-to-your-html-file.html” with the actual URL of your uploaded HTML file.
You can get this URL by right-clicking on the file in the file manager and selecting “Copy Link Address” or a similar option.
Save or update the page/post to apply the changes.
7. Verify and Test
View the page/post on the frontend of your WordPress website to ensure the HTML content is displayed correctly. Click on the link you added to test if the embedded HTML file opens as expected.
Remember that this method requires a bit more technical knowledge and can have security implications, so make sure to use it responsibly and securely. Always review and sanitize the HTML code to minimize any potential risks.
Best Practices and Precautions
While embedding HTML in WordPress opens up exciting customization possibilities, it’s crucial to follow some best practices and take precautions to ensure a smooth and secure experience:
- Advantages of Using the WordPress Editor: The WordPress editor is perfect for embedding smaller HTML snippets directly into posts or pages. It’s ideal for quick additions like custom buttons or simple forms.
- Understanding Security Implications: Custom HTML can pose security risks if not handled with care. Always ensure that the HTML code comes from a trusted source, as malicious code can harm your website’s functionality or compromise security.
- Tips for Testing and Troubleshooting: Before making the embedded HTML live, test it thoroughly to ensure it functions as expected. If you encounter issues, check for conflicting code or use the browser’s developer tools to debug.
- Using the Custom HTML Widget for Safer Embedding: For more complex HTML elements or third-party integrations, using the custom HTML widget is safer. It keeps the HTML isolated from the main content editor, minimizing the risk of accidental modifications.
Some Examples of HTML Embedding in WordPress
- Embedding a YouTube Video or Google Map: You can use HTML to embed a YouTube video or Google Map directly into a post or page, making your content more engaging and interactive.
- Adding Custom Forms or Interactive Elements: Create custom contact forms or interactive elements like sliders and image galleries using HTML, enhancing user experience and encouraging interactions.
- Integrating Third-Party Widgets and Plugins: HTML can be used to integrate external widgets and plugins seamlessly into your website, expanding its functionality and providing additional features.
Troubleshooting Common Issues with HTML File
- Identifying and Resolving Conflicts: Sometimes, embedded HTML may clash with other WordPress elements, causing unexpected behavior. If you notice conflicts, review the HTML and adjust it accordingly.
- Handling Responsive Design Challenges: Ensure that your embedded HTML is responsive and adapts to different screen sizes for a seamless user experience on all devices.
- Debugging Potential Errors: If your embedded HTML isn’t working correctly, check for syntax errors in the code and validate it using online HTML validation tools.
Conclusion
Embedding HTML in WordPress allows you to customize your website’s content and functionality, elevating your user experience and setting your site apart from the rest. With the two methods outlined in this blog, you can confidently add HTML elements to your WordPress website. Remember to exercise caution, test thoroughly, and enjoy the creative possibilities that custom HTML brings to your online presence. Happy coding!
